任務清單-界面
2024年12月10日大约 4 分鐘
學習內容:
- 設計任務清單的圖形界面。
- 學習使用新的元件:
QLineEdit,QListWidget。 - 使用布局工具進行元件對齊與自動排列設置。
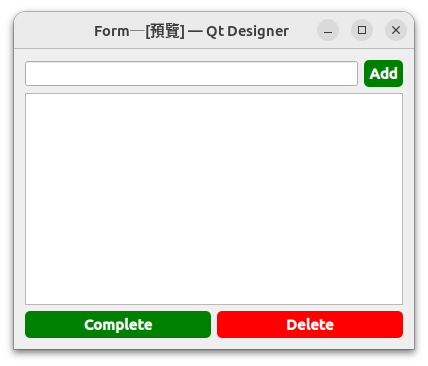
本頁所要製作的圖形界面如下:

製作步驟
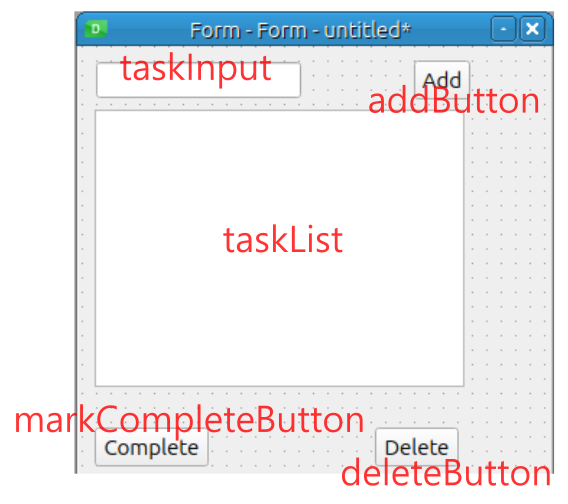
首先要做出一個類似下面圖案的布局,然後再加上布局元件及樣式設定加工處理。

圖中紅色字為元件名稱,對應的 Qt 元件類別如下所示:
- taskInput: QLineEdit
- addButton: QPushButton
- taskList: QListWidget
- markCompleteButton: QPushButton
- deleteButton: QPushButton
以下說明詳細步驟。
步驟 1:啟動 Qt Designer
- 啟動 Qt Designer。
- 在「New Form」窗口中,選擇
Widget,然後點擊Create。
步驟 2:設置窗口屬性
- 在右側的 Object Inspector 中選擇主窗口(默認名稱為
Form)。 - 在右側的 Property Editor 中:
- 設定窗口的 windowTitle 為
To-Do App。 - 選擇 geometry 設定適當調整窗口大小,例如 width = 500,height = 400。
- 設定窗口的 windowTitle 為
步驟 3:添加元件
3.1 添加 Line Edit(輸入框)
- 在左側的 Widget Box 中,找到
QLineEdit,將其拖到窗口頂部。 - 使用右側 Property Editor 修改屬性:
- placeholderText:
Enter a new task... - objectName:
taskInput。
- placeholderText:
3.2 添加 Push Button(新增按鈕)
- 找到
QPushButton,拖到輸入框右側,並對齊。 - 修改屬性:
- text:
Add - objectName:
addButton - StyleSheet(樣式):
background-color: green; color: white; font-weight: bold; border-radius: 5px; padding: 5px;
- text:
3.3 添加 List Widget(任務列表)
- 找到
QListWidget,將其拖到窗口中間(輸入框和按鈕下方)。 - 調整大小以占據主要部分,便於顯示多條任務。
- 修改屬性:
- objectName:
taskList.
- objectName:
3.4 添加底部 Push Buttons
- 添加兩個
QPushButton到窗口底部,並水平對齊。 - 第一個按鈕(左側):
- text:
Mark Complete - objectName:
markCompleteButton - StyleSheet:
background-color: green; color: white; font-weight: bold; border-radius: 5px; padding: 5px;
- text:
- 第二個按鈕(右側):
- text:
Delete - objectName:
deleteButton - StyleSheet:
background-color: red; color: white; font-weight: bold; border-radius: 5px; padding: 5px;
- text:
步驟 4:調整布局
對齊元件
- 確保
taskInput和addButton在同一行。 - 確保
taskList佔據中間區域。 - 確保底部按鈕(
markCompleteButton和deleteButton)在一條水平線上,並居中對齊。
- 確保
使用 Layout(布局)工具
- 選中
taskInput和addButton,右鍵選擇Lay Out Horizontally。 - 選中整個窗口內的所有元件,右鍵選擇
Lay Out in a Grid,使所有元件可以隨窗口大小調整而自動排列。
- 選中
步驟 5:保存文件
- 點擊
File > Save As,將文件保存為todo_app.ui。 - 文件保存到您的工作目錄中,便於稍後在 PyQt 程式中使用。
關於 Stylesheet 中的設定
在設置 Qt Designer 中的樣式(StyleSheet)時,我們使用了 CSS-like 樣式語法,它可以用來設置元件的外觀,例如背景顏色、字體樣式、邊框等。以下是各樣式屬性的解釋:
background-color
- 用於設置元件的背景顏色。
- 在此例中:
background-color: green;將按鈕背景設置為綠色。background-color: red;將按鈕背景設置為紅色。
- 範例:
background-color: green;
color
- 用於設置文字的顏色。
- 在此例中:
color: white;將按鈕文字設置為白色,確保在深色背景(如綠色或紅色)上仍然清晰可見。
- 範例:
color: white;
font-weight
- 定義文字的粗細。
- 在此例中:
font-weight: bold;讓按鈕的文字變粗,增加可視性和設計感。
- 範例:
font-weight: bold;
border-radius
- 設置元件的邊框圓角程度。
- 在此例中:
border-radius: 5px;為按鈕添加了圓角,使按鈕看起來更柔和。- 設定的值越大,圓角效果越明顯。
5px表示半徑為 5 像素的圓角。
- 範例:
border-radius: 5px;
padding
- 定義內容與按鈕邊框之間的內部間距(內填充)。
- 在此例中:
padding: 5px;增加了按鈕內部的空間,使文字不會緊貼邊框,讓按鈕看起來更舒適。
- 範例:
padding: 5px;
完整的範例樣式表
下面是一個完整的按鈕樣式設置:
background-color: green;  /* 設定綠色背景 */
color: white;            /* 設定白色文字 */
font-weight: bold;       /* 文字加粗 */
border-radius: 5px;      /* 圓角邊框 */
padding: 5px;            /* 內邊距 5px */
將其應用到 addButton,它的外觀效果是:
- 背景為綠色。
- 按鈕文字為白色、加粗。
- 邊框帶有圓角(更美觀)。
- 文字與邊框有一定距離,增強視覺效果。
類似的邏輯也適用於 markCompleteButton 和 deleteButton,只需根據需要調整 background-color 和其他屬性即可。
練習
設計自己喜歡的版面布局以及元件的樣式設定。
